
How to Root Lenovo Vibe P1m [100% Working]
So you have been searching long for a genuine method to root Lenovo Vibe P1ma40 which is the international or ROW version of Lenovo P1m. My loving Indian buddy can also root their Lenovo Vibe P1ma40 using this method. If you are a Chinese user then stay away else, you will leave comments here and I will not be able to fix your problem. Lenovo Vibe P1m is the low budget version of flagship Lenovo P1. In this post, I am going share you a-z guide to root Lenovo Vibe P1ma40 with a genuine way. But before rooting your Lenovo P1ma40 you must know pros and cons about rooting an Android device, so check it yourself from the internet.

How to Root Lenovo Vibe P1m (P1ma40)
NOTE: This rooting method is for Lenovo Vibe P1m, model no P1ma40 ROW version. If you have a Chinese version of Lenovo Vibe P1m then don’t try this method.
A. Download tools
SP the Flash Tool Win v5.1524.00
B. File Preparation
1. Now send the SuperSU-v2.49.zip file from your PC to the external memory of your Lenovo Vibe P1m
2. Now right click on TWRP_2.8.7.3_P1ma40.7z file and select Extract to TWRP_2.8.7.3_P1ma40.7z\, you will find recovery_TWRP_2.8.7.3_P1ma40.img and MT6735M_Android_scatter.txt inside the folder.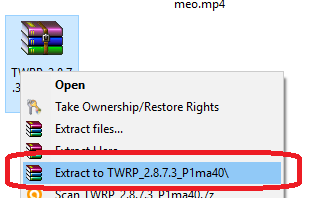
3. Unrar the SP flash tool.
C. Enable USB Debugging
Go to Settings>> About>> Build number and tap it 7 times to unlock Developer options. Then return to Settings>> Developer options and tick the USB Debugging option.
D. Install Driver
Install the driver then restart your PC, then connect your phone to PC via USB cable and wait till Windows configures it. Make sure the USB Debugging is enabled in this process. Once the configuration has completed, again restart your PC.
Install the USB VCOM Driver also!
If you are using Windows 8 or Windows 8.1 then you may face problem to install the driver so follow these steps to install an unsigned driver.
For Windows 8:
1. Win + I -> Change the computer settings -> General -> Special boot options -> Restart Now.
2. When you turn off the tap Diagnostics -> Advanced Settings -> Boot Options -> Restart.
3. A menu appears, select it in the “Disable the mandatory driver signing checks” – for this you have to press F7.
For Windows 8.1:
1. Win + I -> Change the computer settings -> Update and Restore -> Restore -> Restart Now.
2. When you turn off the tap Diagnostics -> Advanced Settings -> Boot Options -> Restart.
3. A menu appears, select it in the “Disable the mandatory driver signing checks” – for this you have to press F7.
E. Install TWRP Recovery and root Lenovo Vibe P1m
NOTE: Before doing this process make sure you have a backup of contacts, SMS, call log or files in internal memory. As it will format your whole phone.
1. Charge your phone up to 80% and disable all those firewalls or antivirus on your PC.
2. Run as Administrator the flash_tool.exe from the SP_Flash_Tool_v5.1524.00.000 folder.
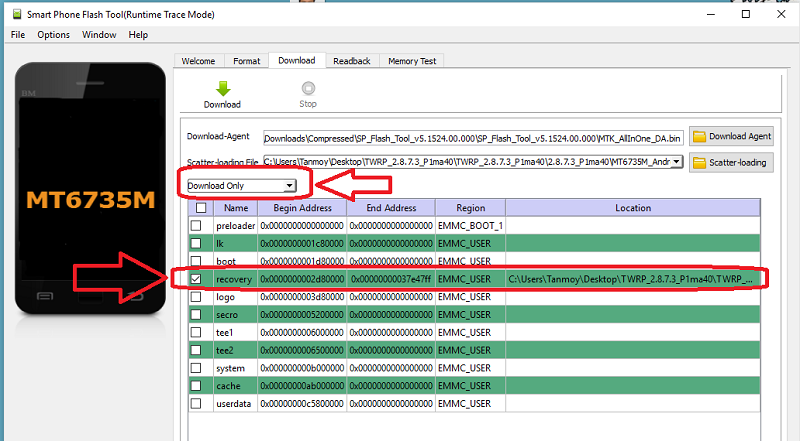
3. Click on “Scatter-loading” and browse the scatter file MT6735M_Android_scatter.txt, you will find this in 2.8.7.3_P1ma40 folder.
4. Now it will show like this, make sure only recovery selected and selected the Download only option.
5. In the menu “Option” tab, go to “Download“, and put a “tick” in the “Storage Checksum“.

6. Now hit the Download button
7. Now turn off the phone and wait for 10-30 seconds
8. Connect your Phone to PC via USB, this will start the flashing process.
9. Once the process has completed, we will see a huge green tick. Now we can disconnect the phone from the cable. You have successfully installed TWRP recovery
10. Make sure phone is switched off. Now first press and hold volume down button, then press power button untill you see the menu of the three option like first one is recoery, second one fastboot. Now use the Volume Down button to navigate to recovery and press Volume Up button to select it.
11. Browse the SuperSU-v2.49.zip from your external sd card and flash it
12. Reboot your Phone
Now you have root access on your Lenovo Vibe P1m. Just go to Google play store and install Root Checker and run it to check whether your Lenovo K3 Vibe P1m has root access or not.
How to root Lenovo Vibe P1m
Easy way to root Lenovo Vibe P1ma40

After step-8 nothing happens, phone goes to charging mode and there is not huge green tick.
Driver not installed, make sure you install VCOM Driver also!
Hi Toamoy,
Thanks for the article, I happened to get one Lenova-vibe p1ma40. In your article you mentioned if the device is of china version do not try this method. How will I know it is china version, nowadays all mobile phone is manufactured by default in China only.
Is there any key or procedure to check whether the phone is of China version
Thanks
Joseph John
It’s not about where its manufacturer, its about which OS version it’s using. If the Lenovo device is international version which is called ROW or the rest of the world then you can find it on Device information. In Chinese or CN version there will be no ROW mention in Device information by accessing Settings.
Exactly. Thanks for update.
Last line, “Now you have root access on your Lenovo K3 Note ROW or Indian version. Just go to Google play store and install Root Checker and run it to check whether your Lenovo K3 Note ROW or Indian version has root access or not.”
Lenovo K3 note? Sure, it works the same on P1m.?
It was just a typo error! This method works fine!! And Root checker applicable for any android phone!
my p1m hardware version is MT6735P, any chance to have scatter file for same version or shall I use the MT6735S instead?
my p1m hardware version is MT6735P, any chance to have scatter file for same version or shall I use the MT6735S instead?
You can use scatter file of 6735m for 6735p . Its available on web. I used that to reinstall the official firmware.
Dear Tanmoy Das
I’ve try this model of lenovo.Recovery is successfully installed.But can’t enter TWRP mode.plz advice me to anythings.Thanks a lot.
Thanks for your comment. Yes, there was a misguide. I have updated the post. Check the step 10.
just put the phone off
then keep volume down button pressed
now press the power on button
wait till you see menu on screen,… menu font is very fine
then press voulme up button when the arrow is pointing to recovery
then the mobile will reboot and load in to recovery.
THANK YOU FOR YOUR TUTORAIL
STUCK IN THE last step
when i flash my phone with SuperSU-v2.49.zip , the flash begin and then i have the following message installation aborted
i tried three times and download it each time
would you please give us the crc checksum, my file is : E45C18FF
CAN I DOWNLOAD ANOTHER SUPERSU?
Yes you can download SuperSu stable version from https://download.chainfire.eu/696/SuperSU/ or beta version https://download.chainfire.eu/740/supersu/
I HAVE PURCHASEED LENOVA P1MA40 MOBILE ONLINE FROM FLIPCART.IT RANDOMLY CONNECT TO WIFI ,I HAVE BROADBAND UNLIMITED CONNECTION FROM BSNL BUT I USE INTERNET DATA PLAN OF VODPHONE WHICH IS COSTLY .HAVE ANY SOLUTION ?
LENOVA KE MOBILE RADDI HAI BAKWAS HAI,KACHARA HAI.
So you don’t want that your phone does get connected to WIFI randomly. In wifi setting, there is WLAN recording or something like that. If you enable this then it will automatically connect your device to saved WIFI network.
Thanks , i now have recovery, if you have any info about xposed framework that is working for this lenovo vibe p1m i would be much greatful.
Hi Mr Tanmoy Das
I did the Same as you mentioned but i lost the phone, its say Brom ERROR in 100% progress of flashing and now i can’t flash neither flash it again nor power on this damn phone
just a red light when charging or connecting to pc but there is no battery icon
so any idea ? i really appreciate your help
i don’t know what happen ? my model is P1ma40 exactly
king root app make it easily…try try but dont crii :p
can this work on a lenovo vibe p1a42??please give me a answer
You are talking about Vibe P1 then I am sorry as its only for Vibe P1m!! Don’t try this method on P1
Thanks lot…I rooted my Vibe P1m as per your instruction and work perfectly.
By tapping 7 times on build number it says you are already a developer
Then you don’t need to tap again!!
Hello, I successfully rooted my p1ma40 thanks to you. However, I tried to flash a custom rom for p1m, is it different from p1ma40? Because when I boot my phone, it just goes to TWRP recovery. Do you have the stock rom for p1ma40? Thank you.
No, I don’t have. Before installing custom ROM you should make a backup of your current stock ROM. Now you need to flash stock ROM via SP Flash tool
Please… Can you drop a post on how to change the imei on the vibe p1m!!??
Hi – The SP flash tool scatter part portion – Do I do it from fastboot or?`
Please be clear.. Unable to get you.
Thanks a lot bro…i have tried many sites but u were the best none of them worked atlast it was time for ur tutorial where yours have got completed..thanks
Thanks Brother, It really working, Thanks for sharing.
how to know that my lenovo vibe p1m is Chinese or not?
Go to build number. If its ROW then there will be written !!
Can’t install vcom driver on my win 7 laptop. Error message appear “the INF file you selected does not support this method of installation”
Skip installing the VCOM driver! Moreover, can you send me the VCOM driver as I have deleted it accidently! Mail at [email protected]
thank you so much. pls how do i change the imei? i’ve tried mtk engineering mode apk (mobile uncle doesnt work), i’ve tried going to nvram and changing from there using imei.exe(which i ran with command prompt) but in the end , nothing worked. pls tell me how, i need it urgently please
IMIE problem is very critical. You should make an IMIE backup via MobilUncle tool earlier!! Otherwise, Google it!!
unable to download USB VCOM DRIVER 🙁
Try without this driver!
cant install supersu. says instalation aborted. how to solve this??
Are you flashing SuperSu from TWRP recovery? Try this SuperSu
https://download.chainfire.eu/921/SuperSU/UPDATE-SuperSU-v2.65-20151226141550.zip
After step-8 nothing happens, phone goes to charging mode and there is not huge green tick, VCOM Driver is not downloading, the above link is showing some error. please help me.
Can you make a video for the entire process and upload on YouTube.. It will be very useful for new users..THANK YOU
and how to unroot lenovo vibe p1m? can you tell me about that
Plz how can I tweak/change my imei to that of blackberry?
Add me on WhatsApp XXXXXXXXXXX for d procedure in tweaking ur lenovo imei.
Don’t post mobile number like this in public… You can comment here your problem here
how about Vibe P1
thanks this work for my hp thanks a lot
Thank you Tanmoy Das! You are very kind!