How To Root Lenovo K3 Note ROW or Indian Version
After writing an article on How To Root Lenovo K3 Note Chinese Version everyone asked me how to root Lenovo K3 Note ROW or Indian version of the model no K50a40. Everyday I think to write about how to root Lenovo K3 Note ROW or India version, but my busy schedule keeps me away from this. But today I have made my mind to write tutorial about rooting method of Lenovo K3 Note ROW or Indian Version. Now you can root your Lenovo K3 Note ROW or Indian version easily by this tutorial. Before rooting your Lenovo K3 Note ROW or Indian version make sure you properly knows about the pros and cons of rooting. If you don’t know just Google it. This tutorial is for experimental purpose. I am not responsible if you do something wrong and your phone got damaged. So do it at your own risk.
How To Root Lenovo K3 Note ROW or Indian Version K50a40
MEDTHOD A: BY SP FLASH TOOL
A. Download tools
SP the Flash Tool Win v 5.1524 (28Mb)
B. File Preparation
1. Now send the SuperSU-v2.49.zip file from your PC to the internal memory of your Lenovo K3 Note
2. Now right click on TWRP_2.8.7.0_AtlonX2_orig.rar file and select Extract to TWRP_2.8.7.0_AtlonX2_orig.rar\, you will find recovery.img inside the folder.
3. Unrar the SP flash tool.
C. Enable USB Debugging
Go to Settings>> About>> Build number and tap it 7 times to unlock Developer options. Then return to Settings>> Developer options and tick the USB Debugging option.
D. Install Driver
Install the driver then restart your PC, then connect your phone to PC via USB cable and wait till Windows configures it. Make sure the USB Debugging is enabled in this process. Once the configuration has completed, again restart your PC.
If you are using Windows 8 or Windows 8.1 then you may face problem to install the driver so follow these steps to install an unsigned driver.
For Windows 8:
1. Win + I -> Change the computer settings -> General -> Special boot options -> Restart Now.
2. When you turn off the tap Diagnostics -> Advanced Settings -> Boot Options -> Restart.
3. A menu appears, select it in the “Disable the mandatory driver signing checks” – for this you have to press F7.
For Windows 8.1:
1. Win + I -> Change the computer settings -> Update and Restore -> Restore -> Restart Now.
2. When you turn off the tap Diagnostics -> Advanced Settings -> Boot Options -> Restart.
3. A menu appears, select it in the “Disable the mandatory driver signing checks” – for this you have to press F7.
E. Install TWRP Recovery on Lenovo K3 Note ROW Version
NOTE: Before doing this process make sure you have backup of contacts, SMS, call log or files in internal memory. As it will format your whole phone.
1. Charge your phone up to 80% and disable all those firewalls or antivirus on your PC
2. Run as Administrator the flash_tool.exe, that you will find by extracting SP the Flash Tool Win v 5.15 24.rar
3. Click on “Scatter-loading” and browse the scatter file MT6752_Android_scatter.txt, you will find this in TWRP_2.8.7.0_AtlonX2_orig folder.
4. Now it will show like this, make sure only recovery selected and selected the Download only option
5. In the menu “Option” tab, go to “Download”, and put a “tick” in the “DA DL All with Checksum”;
6. Now hit on the Download button
7. Now turn off the phone and be sure to remove the battery for at least 5 seconds
8. Put the battery and connect your Phone to PC via USB, this will start the flashing process.
9. Once the process has completed, we will see a huge green check box. Now we can disconnect the phone from the cable. You have successfully installed TWRP recovery
10. Now press and hold volume up + down buttons, then power button. In other words, hold three buttons simultaneously. When the Lenovo logo appears, release the power button, the volume of both to continue to hold. ASAP phone enters the TWRP release all the buttons.
11. Now select Install Zip then Select Install Zip from /sdcard and browse the SuperSU-v2.49.zip file that you copy pasted earlier to flash SuperSU-v2.49.zip
12. Reboot your Phone
Now you have root access on your Lenovo K3 Note ROW or Indian version. Just go to Google play store and install Root Checker and run it to check whether your Lenovo K3 Note ROW or Indian version has root access or not.
MEDTHOD B: BY ADB FASTBOOT
Part 1: Enable USB Debugging on your Lenovo K3 Note:
Go to Settings>> About>> Build number and tap it 7 times to unlock Developer options. Then return to Settings>> Developer options and tick the USB Debugging option.
Part 2: Download and Install Driver Lenovo K3 Note
Download this driver here. Unrar this! Inside you will get Lephone2.0.exe, just install it. Now while installing PdaNetA4150.exe just connect your phone to PC via USB cable and wait till Windows configures it. Make sure the USB Debugging is enabled in this process. Once the configuration has completed, again restart your PC.
Part 3: Download Tools
Download Minimal ADB and Fastboot.zip
Download UPDATE-SuperSU-v1.94.zip
Part 4: File preparation
- Copy and paste the UPDATE-SuperSU-v1.94.zip file to your Phone’s internal or external memory from your PC.
- Unzip Minimal ADB and Fastboot.zip to a folder.
Part 5: Root Lenovo K3 Note
- Open the “Minimal ADB and Fastboot” folder
- Inside the folder you will get py_cmd.exe, just run as administrator
- It will show like a command prompt
- Connect your phone to PC via USB, you will get a pop up on your phone saying ADB debugging, just allow it.
- Now on the command prompt, type this command and hit enter.
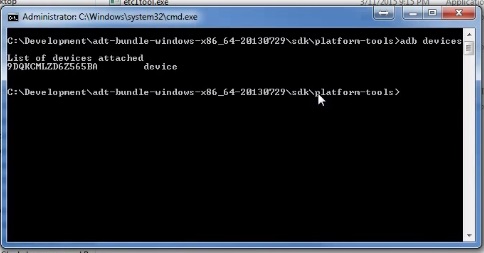
adb devices
- If everything ok, it will show list of devices attached like this

- Now type bellow command and hit enter
adb reboot bootloader
- Again type this and hit enter
fastboot devices
- Now on your phone you will see something like Fastboot mode
- Now type execute this command
fastboot flash recovery recovery.img
- Now you need to do a tricky job. While running or executing the bellow command you need to hold and press volume UP+DOWN+Power button simultaneously.
fastboot reboot
- If you have done successfully, then you are in CWM recovery. To navigate, use Volume UP and Down buttons and to select use Power button.
- Now select Install Zip then Select Install Zip from /sdcard and browse the SuperSu Zip file that you copy pasted earlier
- Select the UPDATE-SuperSU-v1.94.zip file, then choose Yes-Install SuperSu.zip to flash it.
- Once it’s done, just go back the select reboot the select reboot system to reboot your phone
- Now your Lenovo K3 Note has been rooted.
To whether you Lenovo K3 Note has root access or not, just go to Google play store and install Root Checker and run it.
Also read How To Install Stock ROM On Lenovo K3 Note ROW Version
Incoming Search:
root lenovo k3 note india
root lenovo k3 note without pc
root lenovo k3 note k50a40
root lenovo k3 note kingroot
root lenovo k3 note one click
root lenovo k3 note indian version
root lenovo k3 note app
root lenovo k3 note lollipop
how root lenovo k3 note


thanks but when i follow your post, i rooted my mobile but it did not boot after many attempts.
Then i found from other forums that we must unable usb check sum ON in options>downloads and then hit download button on main screen.Now i can reboot ok.
Tanmoy, thank you so much for your ROW ROM guide and this rooting guide ! They are clearly written and easy to follow even by a novice.
Both worked perfectly. The modified China ROM that comes pre-installed on most of the T5’s is a veritable cesspool and turns a great phone into a bad joke. Your guides really make it shine.
When i do this method then every thing is done perfectly but when i check via root checker they show sorry ! root acces is not properly installed on this devoce
device:lenovo k50a40
android version: 5.0
Can you access custom Recovery? Then flash the SupuerSU.zip again!
Wilbb able to boot cwm instead of flashing?
Cos i onli want cwm backup n keep stock recovery intact.
Before flashing the SuperSu you can make a backup of stock ROM using CWM.
I am getting error : cannot determine image file name for ‘recovery.img’.
What should i do?
Which Method you have tried? I will recommend you to try the second method!
the cwm recovery mode is not opening. its just starts with normal lenovo recovery mode. used 2nd method. reply asap!
Hey, you need press and hold volume UP+DOWN+Power button simultaneously while executing this command “fastboot reboot”. Mean as soon as you hit enter you need to press those buttons.
I tried the same but when hit vol + – & power button 4 options come and phone’s touch also work Pls help
I would suggest trying the method B or fastboot method!
Pls tell no. 10 is fastboot
flash recovery recovery.img
Or
Type > fastboot flash recovery
& drag and drop recovery.img
If the recovery.img file is in the ADB folder then type
fastboot flash recovery recovery.img
If your recovery.img file is elsewhere, then type
fastboot flash recovery and drag and drop that recovery.img file
Everything OK just 1 problem when enter command – fastboot flash recovery recovery. img
sending ‘recovery’ …
FAILED
finished . total time: 0.406s
what to do
what is oem option I can’t find it in devolper option how to enable it in lenovo k3 note
Fantasic this is truly working option after so many months of exploration.
Hi Guys,
For me method B was successfully worked, so those getting Lenovo K3 K50-a40. Better follow that.
Thank you so much Tanmoy Das….For your great effort…keep it up.
I tried this method, But when hit Fastboot Devices then, It’s not working, On mobile Sceen just shows Fastboot Mode, Nothing happen in CMD and then I hit the this command fastboot flash recovery recovery.img but It’s just only shows the Device Searching….and nothing happen….And I had also installed all the drivers. ………… So, Please help me to solve this issue
After root is it possible to upgrade to marshmallow 6.0,Lenovo has officially released it.
After flashing the superuser, and restarting.. Mobile getting hanged at the login screen and later it goes blank.
I tried fast boot method
Try the Sp Flash tool method!
Could you please help me out? My phone is stuck at the Lenovo boot screen. I followed the second method word for word.
Install Stok ROM!!