How to Root Redmi Note 4 [100% Working]
Hello, guys, I am back with another rooting tutorial. This time market beast Xiaomi Redmi Note 4, the successor of Redmi Note 3. Redmi Note 4 is a great phone as like Redmi Note 3. It comes in three variant on parameter or RAM. So in this post, I am going show you how to root Redmi Note 4 in easy steps. If you previously own Redmi Phones then this might be easier. Still here is the guide for you.
Warning: Flashing can potentially brick or bootloop your device. We don’t hold any responsibility for any error or problem caused by following this guide. Do with your own risks. This root method for Snapdragon variant of Redmi Note 4.
Read also How to Root Redmi 4A [100% Working]
How to Root Redmi Note 4
NOTE: Make a backup of all your data including msg, contacts files, images etc.
A. Download Tools
Download and install Universal ADB Driver
Download platform-tools
Download TWRP Recovery (Updated)
Download SuperSu.Zip
Download lazyflasher-no-verity-opt-encrypt.zip (Don’t unzip it)
Download Mi Unlock Tool
B. File Preparation
- Unzip platform-tools-latest-windows.zip and you will get platform-tools
- Just copy-paste the twrp.img file into the platform-tools Folder.
- Install the ADB Driver in your PC
C. Unlock bootloader in Redmi Note 4
- Go to MiUnlock, Sign in with your Mi ID and request for Bootloader unlock with proper reason.
- You will confirmation on your mobile via SMS after few days.
- Once you get confirmation Unzip the MiFlashUnlock_1.1.0317.1_en.zip file
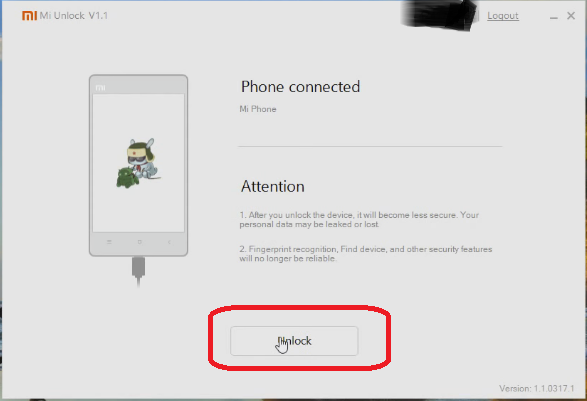
- Run the MiFlashUnlock.exe , and sign in with your Mi-Account
- Shut down your phone manually, and hold Volume down key and Power button to enter Fastboot mode;
- Connect your phone to PC using USB cable and click “Unlock”.

- Once the unlock process completed just hit the reboot button

D. Enable USB Debugging and OEM Unlock
- Enable Developer option- Goto Settings > About phone > tap MIUI version 7 times.
- Enable USB Debugging- Goto Settings > Additional settings > Developer options > USB Debugging and enable it.
- Enable OEM Unlock – Goto Settings > Additional settings > Developer options > Enable OEM Unlock.
E. Install TWRP Recovery in Redmi Note 4
- Copy paste the SuperSu zip and lazyflasher-no-verity-opt-encrypt.zip files from your PC to internal memory of Redmi Note 4.
- Switch of your Redmi Note 4
- Now press and hold Power + Vol DOWN until it boots into fastboot mode
- Now connect your Redmi Note 4 to PC via USB cable.
- Open the platform-tools Folder.
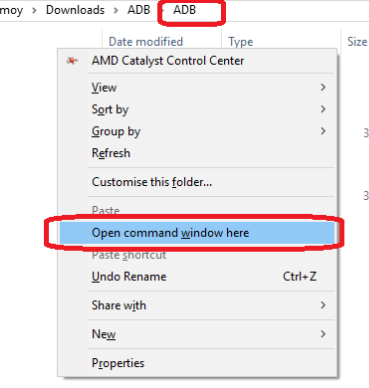
- Inside the folder, hold “Shift” Key then right click and select “Open command Windows here”.

- Now enter this command.
fastboot devices
- If its properly connected to your PC it will show your device with some alphanumeric character
- Now its time to flash TWRP, so run this command( Make sure twrp.img file is present in the ADB folder like I have done in Step B)
fastboot flash recovery twrp.img
- Once flashing done don’t switch on or switch off your device
- Now Press and hold Power+ Vol Up buttons (Note its Vol Up not like Vol Down in step E.3)
- It will boot into TWRP Mode
F. Install SuperSu and Root Redmi Note 4
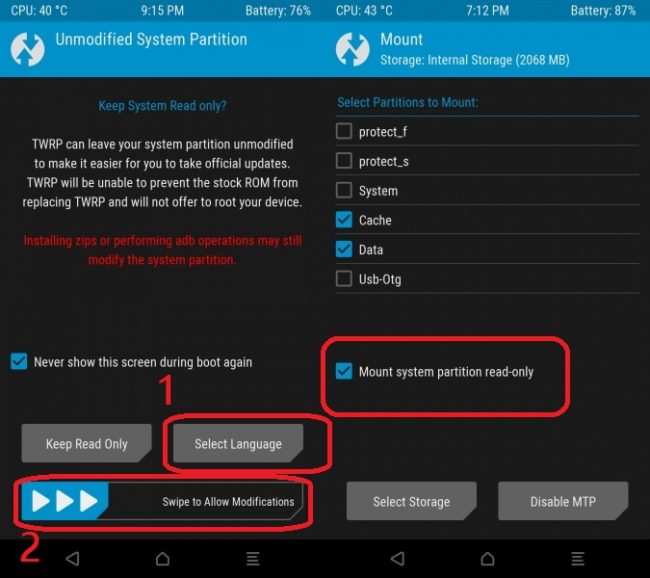
- Select the language and then Swipe to allow modification then mount the storage like this.

- Now go to the main menu
- Click on Backup and make a backup of current ROM for safety. You can skip this!
- If the backup process is done again go to the main menu and tap on Install
- Then browse the SR3-SuperSU-v2.79-SR3-20170114223742.zip and swipe to Install
- Once the flashing process has done, again tap on Install
- Now browser lazyflasher-no-verity-opt-encrypt.zip and install it
- Now tap on Reboot System
- Your device will reboot and it rooted now.
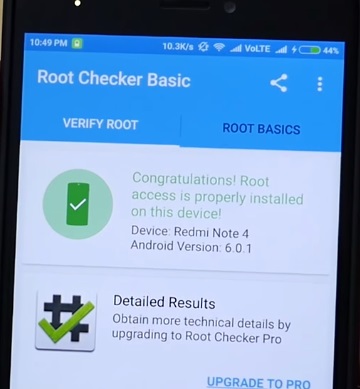
- Install Root Checker and whether Redmi Note 4 rooted or not.

Incoming Search:
Working method to Root Redmi Note 4
Easy way to Root Redmi Note 4
How can I Root Redmi Note 4
Rooting method of Redmi Note 4 Indian variant


Very Good information Bro…
Hello,
I think your E. 8th step is not clear. There is no boot.img in the ADB folder. Do you mean I should rename twrp.img to boot.img ?
It was a typo mistake.. I have corrected it!
Dear Tanmoy,
What you have corrected?…. I am also confused it it…
Plz clear step number 8… should I rename twrp.img to boot.img or boot.img is another file. If this is another file then from where can I get this and if boot.img is renamed file then why in pic of step 8 both (twrp.img & boot.img) are there.
There is no boot.img file , only twrp.img file and I have updated the TWRP file as well as the method so kindly check the whole article.
does it works with miui 8.1.15.0??
Does it work with 8.1.15.0???
I have tested on MIUI 8.1.11.
a very helpful article … very nice work bro
very nice and good article rooted by phone succesfull
Im having bootloop after that, how to fix it?
Have you followed all the steps perfectly?
Want to check whether no need of flashing lazyflasher-no-verity-opt-encrypt ?
Yes you are right as the latest TWRP need it flash it. I have updated the whole post so kindly go through from top to bottom
By using this method will my phone get formatted? I mean does all my data will be cleared by using this method or just my phone will be rooted without any data lost?
Yes! Do backup all your data!
Hello, after E11, my phone always go into the fastboot screen (not TWRP).
Where the problem might be?
Hello. Some progress in this case 🙂 After regular start of phone I select the Settings>About phone>Actualization>Restart to Recovery. After that, phone start on black scrren vith white image of phone with USB cable. Is it some progress for me? I am so unhappy.
Once the TWRP flashing done, don’t switch off or switch on your device, on that condition Press and hold Power+ Vol Up buttons.
link to lazy flasher is dead.
The link is alive… or try this https://docs.google.com/uc?export=download&id=0B9PNWg00FRLcU2czSGxROG1GeDg
Your lazy flasher link says.
Not Found
Error 404
Try this link https://docs.google.com/uc?export=download&id=0B9PNWg00FRLcU2czSGxROG1GeDg
Again 404 error, don’t know why.
In any case, I donwload it from a different place and the whole process worked perfect!! thanks!!
Thank you for the easy and detailed steps. rooting done with no problems. the guide at dev-labs was incomplete. thanks again
It’s nice that this method helps you out!!
thank you, it worked on mini 8.5.8.0
This method worked for me to use rooted apps but i’m still unable to remove preinstalled apps, please help me here.
lazyflasher-no-verity-opt-encrypt.zip ………………… not opening
What do u mean by not opening? You need to flash the zip file
Why cant i download “ADB FILE” and “lazyflasher-no-verity-opt-encrypt.zip”?
hello..
i am using this method to unlock redmi note 4 (after updating to MI UI 9.2.1.0).
how to confirm the step E.10 (Once flashing done don’t switch on or switch off your device)
and should the phone connected to PC all the time and if yes bootload screen will display on screen then i press the power + volume up button, but the phone got restarted, it doesn’t go in to TWRP mode, and when i did this after switching it off then it only shows 3 options. 1.Reboot 2.wipe data, 3.MI assistant.
what should i do, need help.
Thank you.