How to Root Redmi 4 [100% Working]
First of all Eid Mubarak! Hope you have a wonderful day with your family and friends. Now today I am back with another rooting tutorial with the season best battery backup and budget phone Xiaomi Redmi 4, don’t get confused with Redmi Note 4. I have already covered it up the rooting method of Redmi Note 4, now its time to root Redmi 4. Rotting Redmi 4 is quite similar with rooting Redmi 4A. But here I am going to show you in detail method and this method is applicable to all variants of Redmi 4. So don’t whether you have Redmi 4 with 2GB, 3GB or 4GB RAM. So lets get started.
Warning: Flashing can potentially brick or bootloop your device. We don’t hold any responsibility for any error or problem caused by following this guide. Do with your own risks. This root method for all RAM variant of Redmi 4.
How to Root Redmi 4
NOTE: Make a backup of all your data including msg, contacts files, images etc.
A. Download Tools
- Download and install Universal ADB Driver
- Download ADB FILES
- Download TWRP Recovery
- Download SuperSu.Zip (Don’t unzip it)
- Download LazyFlasher (Don’t unzip it)
- Download Mi Unlock Tool
B. File Preparation
- Install the ADB Driver in your PC and reboot it
- Unzip ADB.zip and you will get ADB Folder
- Now copy paste the twrp.img inside the ADB Folder
C. Unlock bootloader in Redmi 4
- Go to MiUnlock, Sign in with your Mi ID and request for Bootloader unlock with proper reason.
- You will confirmation on your mobile via SMS after few days.
- Once you get confirmation Unzip the MiFlashUnlock_1.1.0317.1_en.zip file
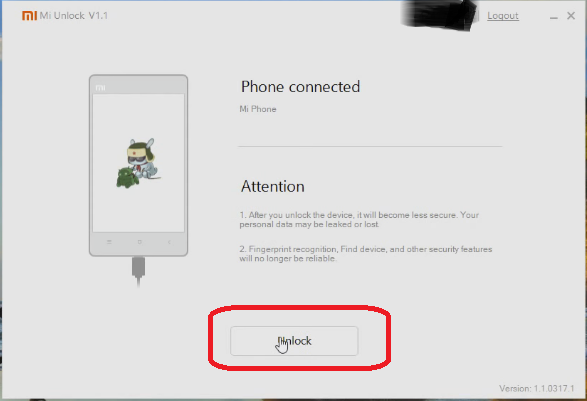
- Run the MiFlashUnlock.exe , and sign in with your Mi-Account
- Shut down your phone manually, and hold Volume down key and Power button to enter Fastboot mode;
- Connect your phone to PC using USB cable and click “Unlock”.

- Once the unlock process completed just hit the reboot button

D. Enable USB Debugging and OEM Unlock
- Enable Developer option- Goto Settings > About phone > tap MIUI version 7 times.
- Enable USB Debugging- Goto Settings > Additional settings > Developer options > USB Debugging and enable it.
- Enable OEM Unlock – Goto Settings > Additional settings > Developer options > Enable OEM Unlock.
E. Install TWRP Recovery in Redmi 4
- Now connect your Redmi 4 to PC via USB cable.
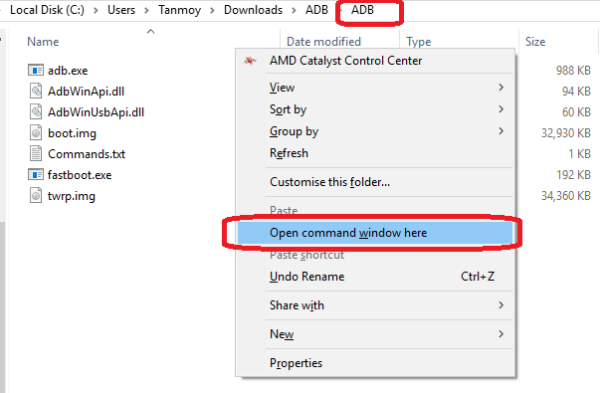
- Open the ADB Folder.
- Inside the folder, hold “Shift” Key then right click and select “Open command Windows here”.

- The Command prompt will open.
- Now enter this command.
adb devices
- If its properly connected to your PC it will show your device with some alphanumeric character
- Now switch off your device completely
- Then press and hold Vol Down and Power button until it boots up in fastboot mode.
- Now run the bellow command. If ADB properly installed it will show your device with some alphanumeric character
fastboot devices
- Now its time to flash TWRP, so run this command (Make sure twrp.img file is present in the ADB folder like I have done in Step B.3)
fastboot flash recovery twrp.img
- Once the flashing process has completed, press and hold Power + Vol Up button unless you see MI logo
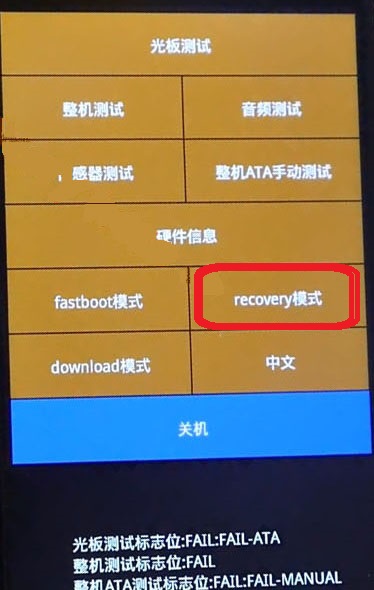
- Now you will get like this, just tap on Recovery

- Next, it will ask for modification in the Chinese language, Just tap on Blue option not the green
- Now It will boot into TWRP Recovery Mode.
F. Install SuperSu and Root Redmi 4
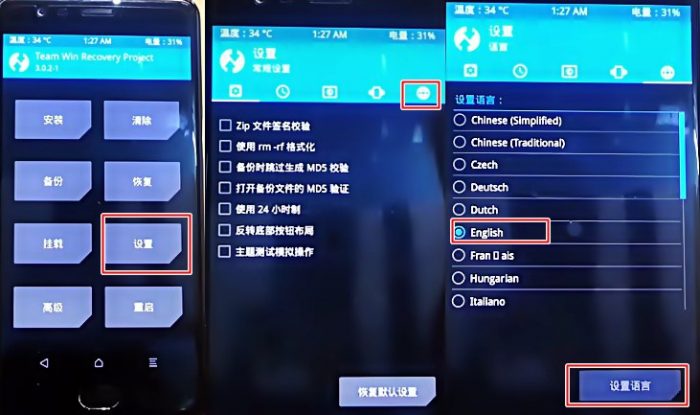
- This TWRP is in the Chinese language so you need to change the language.
- First, swipe to go the main menu of TWRP.
- Now follow as like this bellow pic to change the language to English

- Now tap on Wipe then tap on Format Data, to format you need to type yes
- Once it has done, tap on back and go to the main menu of TWRP
- Tap on Reboot, then tap on Recovery
- It will reboot into TWRP again.
- Now Copy paste the SuperSu and LazyFlasher zip file into your phone internal memory
- Then browse the SuperSu zip file and swipe to Install
- As soon as it flashed browse the LazyFlasher zip file and swipe to flash
- Once the flashing process has done, tap on Wipe Cache/Delvik
- Then tap on Reboot your system.
- The booting process may take 5 to 10 minutes.
- Install Root Checker and whether Redmi 4 rooted or not.
Incoming Search:
Working method to Root Redmi 4
Easy way to Root Redmi 4
How can I Root Redmi 4
Rooting method of Redmi 4 Indian variant


At step 11. how do I know the flashing compeleted? is it when cmd/powershell says this
target reported max download size of 535822336 bytes
sending ‘recovery’ (26582 KB)…
OKAY [ 0.839s]
writing ‘recovery’…
OKAY [ 0.356s]
finished. total time: 1.198s
cuz when I hold volume up and power button it just keeps booting normally
Yes! your command prompt will show flashing done. But as you have mentioned it should boot into Recovery mode as like the picture.
Hi Tanmoy, thanks for this article.
Before I begin, I wanted to make sure that after rooting, does fingerprint recognition still work reliably?
Yup!
Links for LazyFlash & SuperSu is same !
Thanks for the feedback! I have updated!
successfully rooted but i got an issue after this.
i dont have the mtp option anymore after inserting the usb cable to pc but charging only.
please help.
Hey man how to root redmi 4 in miui 9
100% working
Thant Zin
Why do i need lazy flasher???
Super su is necessary i understand
But why lazy flash?
Good Work Sir
My phon was not rooted so how I am makes a phon rooted
Thankyou
Completed upto Step 13, Now phone stuck at MI logo.
sir my phone is rooted but it is not accepting sim
After installing twrp, and trying to enter to twrp am stuck in boot loop
, please help.