How to Root Moto G5 Plus [100% Working]
Recently Motorola has launched the next generation moto phone and that is Moto G5 Plus. Moto G5 Plus is budget oriented camera phone. Though looks and design is the same as moto phone but Motorola has done a great job with camera and battery backup with this Moto G5 Plus. So if you have the Moto G5 Plus then you should be amazed with camera performance but in this post I am going to share you how to root Moto G5 Plus. In this blog I have previously covered the rooting method Moto E3 Power, now its for Moto G5 Plus.
Disclaimer: By attempting any of the processes listed in this thread you accept full responsibility for your actions. I will not be held responsible if your device stops working, catches fire, or turns into a hipster and claims to have been modified before it was cool.
Read also How to Root Moto G5
How To Root Moto G5 Plus [100% Working]
NOTE: Backup all your files like photos, video, mp3 including contacts, SMS etc to your computer as unlocking the Moto G5 Plus Bootloader will completely wipe/delete all files on the device.
A. Download tools
Download Universal Windows ADB Driver
Download TWRP For Moto G5 Plus (Updated) [Direct download link]
Download Motorola Driver
Download ADB FASTBOOT FILES.zip
Download Magisk-v12.0.zip (6.2 MB)
Download lazyflasher-no-verity-opt-encrypt.zip (411.2 kB)
B. Enable USB debugging and OEM Unlocking
- Go to Settings > About phone, and then tap ‘Build number’ 7 times or until you get the message ‘You’re now a developer!’.
- Go back to Settings, choose ‘Developer options’. Find the ‘USB debugging’ option and enable it.
- In the ‘Developer Option’ you will also find the ‘OEM Unlocking’ option, just enable it. It will ask for your PIN/Screen unlock code to enable it.
C. File preparation
- ADB FASTBOOT FILES.zip and select Extract to “ADB FASTBOOT FILES” folder
- Rename twrp-3.1.0-0-n3-potter.img into twrp.img
- Now put the twrp.img file in ADB FASTBOOT FILES folder.
D. Driver Installation on Moto G5 Plus
Install Universal Windows ADB Driver on your PC, then install Motorola Driver and restart your PC.
E. Unlock the Bootloader, flash TWRP and Root Moto G5 Plus
- Connect your Moto G5 Plus to your PC via USB cable
- Once you connect to PC, you will get a pop up on your Moto G5 Plus
- Just tick the “Always allow from this computer ” check box and tap OK

- Open the “ADB FASTBOOT FILES” folder in your PC
- Inside the folder, hold “Shift” Key then right click and select “Open command Windows here”
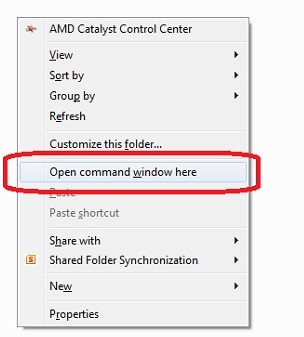
- Now type this bellow command
adb devices - Now you will be able to see your device or Moto G5 Plus. Mean driver installed properly
- Now disconnect your Moto G5 Plus from PC, don’t close the command prompt.
- Put your device in fastboot mode (power off, then press the power and volume down buttons simultaneously).
- It will look like this in fastboot mode
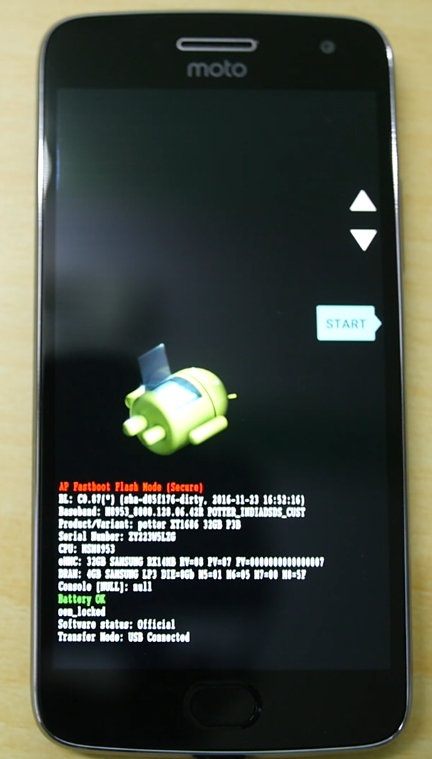
- Now connect your phone to PC via USB
- To check whether your device properly connected to PC, run this command and hit enter
fastboot devices - If its properly connected to PC it will show some numbers and characters (If not showing install moto driver)
- Now type this command and hit enter
fastboot oem get_unlock_data - It will return some strings
- Now right click inside the command prompt and choose Mark then select those 6 line returning strings and hit enter on Keyboard to copy those lines
- Now open this link and paste there like this
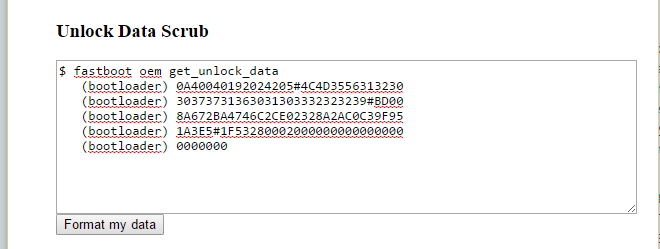
- Now hit Format my data and you will get like this
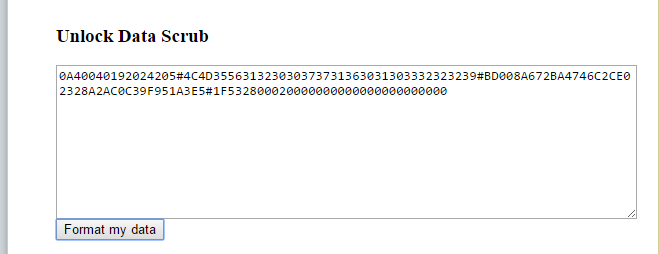
- Just copy this whole text and paste it on a note pad
- Go to this link and create and Motorola account, if you already have then skip this step
- Now open this link on your browser, and paste the text that you copied on step 16 like this.

- Click on “Can my device be unlocked“
- Then choose to agree and click on Request Unlock Key
- Now you will receive unlock key via email. Just copy the Unlock Code from mail (It may take 1-2 day to receive the unlock key via mail)
- Now type this command with your unlock key, here XXXXXXXXXXXXXXXXXXXXXX is example unlock key
fastboot oem unlock XXXXXXXXXXXXXXXXXXXX
- It will return a warning regarding all the data erase. So again type or copy paste this command and hit enter
fastboot oem unlock XXXXXXXXXXXXXXXXXXXX
- Now your Moto G5 Plus boot-loader is unlocked, its time to flash TWRP Recovery
- Type this command and hit enter, just make sure twrp.img file is in the ADB FASTBOOT folder
fastboot flash recovery twrp.img
- It will return to finish once the flashing process complete
- Now take your phone and use Volume UP or down Key to navigate “RECOVERY MODE”
- Once you find RECOVERY MODE just press Power button to enter in recovery mode
- You will see TWRP recovery mode.
- It will ask for a password, just tap on cancel.
- Now tap on Wipe
- Then select Format Data
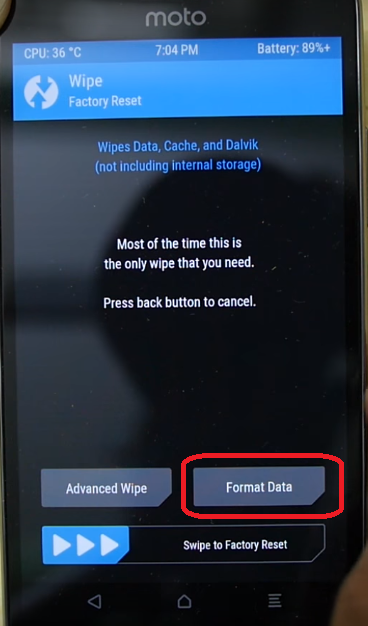
- , you need to type “yes” to format your phone. (This is vital STEP)
- Now on home screen tap on Reboot and select Recovery then tap on “Do not install” like this
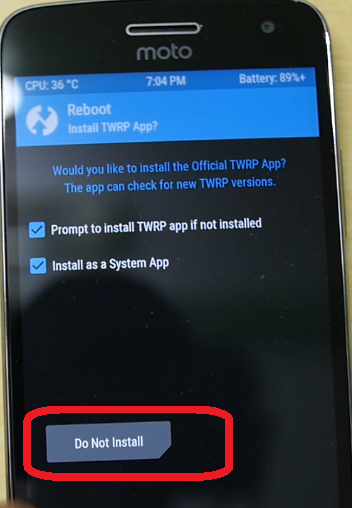
- It will reboot into TWRP Recovey mode again
- As your Phone connected to PC just copy paste Magisk-v12.0.zip and lazyflasher-no-verity-opt-encrypt.zip into your phone internal memory
- Now tap on Install then browse and select Magisk-v12.0.zip (If you put in external then browse external)
- Swipe to confirm the flash
- Again tap on install then browse and select lazyflasher-no-verity-opt-encrypt.zip
- Swipe to confirm the flash
- Now tap on Reboot then select System then tap on “Do not install” like this

- It will may take time to reboot into android mode
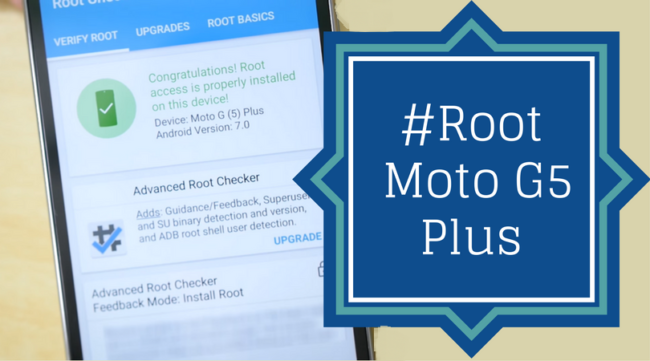
- Once done Your Moto G5 Plus is now rooted.
- To check whether Moto G5 Plus has root access or not, just go to Google Play Store and install Root Checker and run it.
Hope you have understood this guide, so go and Root Moto G5 Plus. In case, any confusion or problem regarding Root Moto G5 Plus just comments here. If you got success to Root Moto G5 Plus then also comment here, it will help other users!!
Incoming Search
Easy way to root moto G5 Plus
How to root Moto G Plus 5th Generation
Install TWRP Recovery on Moto G5 Plus


Will this work on a g5 plus purchase from Amazon with their ad-bloatware on it? They sold the phone for a $50 discount, but now you have an amazon build on it.
Its works on Indian version of Moto G5 Plus
after unlocking bootloader i can’t flash twrp, it gives me this error
“target reported max download size of 536870912 bytes
sending ‘recovery’ (13656 KB)…
OKAY [ 0.363s]
writing ‘recovery’…
(bootloader) Image not signed or corrupt
OKAY [ 0.287s]
finished. total time: 0.653s”
I have updated the TWRP. Try again
that’s not an error….
Hey.. I am also getting this error –
target reported max download size of 536870912 bytes
sending ‘recovery’ (14310 KB)…
OKAY [ 0.314s]
writing ‘recovery’…
(bootloader) Image not signed or corrupt
OKAY [ 0.279s]
finished. total time: 0.611s
Can you please help. Thanks in advance.
read this guide if you have bricked your moto g5 plus at :
http://www.thetechnotriad.com/1371/how-to-unbrick-the-moto-g5-plus/
please reexplain the transition of step 26 from step 25. Type what?
Once you have unlocked bootloader, you need to flash TWRP, for this command its
fastboot flash recovery twrp.img
And hi enter. It will flash TWRP, just make sure twrp.img file is in that folder with proper name.
I followed those exact steps, everything is in its proper place and spelled correctly. It says “error twrp.img not found”
twrp.img file should be in ADB folder and you need to open command prompt from ADB Folder
thank you so much! Im at step 39 now, and whenever i try to copy paste the files into my internal storage, my pc says that my moto is no longer connected, yet it is.
So I followed the steps and installed Magisk-v12 and lazyflasher-no-verity-opt-encrypt but when I boot up the phone says it’s not rooted 🙁 I run the root checked and it says that I’m not rooted still 🙁
NVM! I did’t wipe cache and Dalvik cache when installing. Something that’s missing from this write up, might want to include that step. Thanks!
Hello!
I have three questions/problems:
1. Will this working on Moto G5 (not Plus) ?
2. Whenever I try to install the ‘Universal ADB Drivers’ I get an error message pretty early stating: “The cabinet file ‘_CB65blahblah…’ required for this installation is corrupt and cannot be used. This could indicate blah blah blah…”
3. And assuming the answer to the first question is ‘Yes’ and I found a workaround the second, when i try to fastboot the twrp.img I get this error in the cmd line:
target reported max download size of 536870912 bytes
sending ‘recovery’ (13656 KB)…
OKAY [ 0.444s]
writing ‘recovery’…
(bootloader) Image not signed or corrupt
OKAY [ 0.480s]
finished. total time: 0.926s
Hey, it’s me again,
So I think I bypassed the third problem by typing: ‘fastboot boot twrp.img’ and now I can access the TWRP recovery tool but after I install the magisk and lazyflasher tools and restart system I still don’t have access to root
Hey, still me, additionally Root Checker tells me that I have superuser app installed, superuser binary files installed but an error in the root user account
You are not correct in 26:
fastboot flash recovery twrp.img
target reported max download size of 536870912 bytes
sending ‘recovery’ (13656 KB)…
OKAY [ 0.441s]
writing ‘recovery’…
(bootloader) Image recovery failed validation
(bootloader) Preflash validation failed
FAILED (remote failure)
finished. total time: 0.461s
step 24: fastboot oem unlock XXXXXXXXXXXXXXXXXXXX
(bootloader) Check ‘Allow OEM Unlock’ in Android Settings > Developer Options
OKAY [ 0.012s]
step 25: reboot phone to normal and tick option in MENU > Developer options > Allow OEM Unlock
power off and Put your device in fastboot mode again (power off, then press the power and volume down buttons simultaneously).
now it is unlocked, you can flash recovery twrp.img
Não consigo mais entrar no sistema android na etapa pra colocar Magisk-v12.0.zip e lazyflasher-no-verity-opt-encrypt.zip na memória interna do telefone. Pois além de não entrar no sistema android, ao tentar mount internal storage o pc não reconhece o celular e não é possivel então colocar os arquivos (Magisk-v12.0.zip e lazyflasher-no-verity-opt-encrypt.zip ) na memoria interna do celular.
O que fazer? Perdi meu celular?
First of all kindly make comments in English language. Do you have access to TWRP? then you can browse file from external. If you don’t have access to TWRP and unable to boot into system then I would recommend you to flash STOCK ROM. Have you properly unlocked the bootloader?
Hi, after step 34, I am getting this: http://i63.tinypic.com/33jn886.jpg
Please explain how should i proceed with
I have got through somehow and now it says root access not properly installed
http://i67.tinypic.com/70uyc6.png
Do you have access to TWRP Recovery then repeat the steps from 37 to 42. Make sure you use the file that we have provided here.
I`ve successfully unlocked bootloader and also flashed twrp which is functional but formatted my internal storage, and phone does`nt seem to boot up, every time i land up with twrp recovery else a bootloader unlocked warning which i`ve kept aside for 3 hours to boot itself, nothing happens,
Go through step E 35. Mean have you tap on “Do not install”?
can i unroot moto g5 plus after doing this
i deleted my camera folder mistakenly thats why i root device to restore but after that can i unroot my device
mean al the pics deleted?
When I try to flash the twrp.img it says:
target reported max download size of 536870912 bytes
sending ‘recovery’ (14310 KB)…
OKAY [ 0.465s]
writing ‘recovery’…
(bootloader) Image recovery failed validation
(bootloader) Preflash validation failed
FAILED (remote failure)
finished. total time: 0.492s
Bootloader is not unlocked!
Nevermind about that last reply, but I have a new question in that catagory.
So, I rebooted and formatted my data and it is properly wiped. But while twrp is running while connected to my computer through usb, my pc does not recognize that a device is connected, meaning I cannot copy paste the files into my g5 plus’ internal storage. Please help, friend.
i get “error: cannot load twrp.img” ?
Thanks for the detailed steps!
i did not see twrp mode again
Recovery mode
” no command.”
Once you find RECOVERY MODE just press Power button to enter in recovery mode
You will see TWRP recovery mode.
during step 39 “failed to mount /data” is being shown…pls provide a fix for this…